
How to Use and Create Lightroom Presets


This post contains affiliate links. I will make a small commission if you make a purchase through one of these links, at no extra cost to you.
Creating your own presets in Lightroom is a great way to speed up your food photography workflow while keeping your own unique photo-editing style.
In this post, we are going to walk through the process of creating presets and dive into why you should consider creating your own! We will also discuss purchased or free presets that you might have downloaded from other sources. It’s important to make the distinction between the two types of presets.
Food photography can be a long process if (in addition to being the photographer) you’re also a recipe developer, food stylist, prop stylist, and photo editor. Most food bloggers fall under all of those categories.
As food bloggers, anything you can do to speed up any part of the entire process of creating just one recipe for your website is a lifesaver. Lightroom makes it incredibly easy to sync settings and save presets, which helps to speed up your workflow and get you out of the editing chair faster.
What is a Lightroom Preset?
A Lightroom preset is simply metadata (information) that tells Lightroom what adjustments to make to the images you’ve imported into your Lightroom catalog. This information is based on the changes you previously made to adjustment sliders. Once you are satisfied with your adjustments, you save those adjustments into a preset to use on other photos.
What are adjustment sliders?
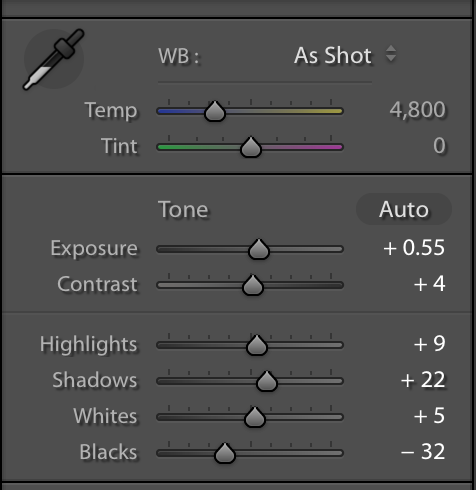
The adjustment sliders are how we as photographers tell Lightroom how to process our images. You will find the adjustment sliders on the right-hand side of your image. Some of the adjustments you can make using Lightroom adjustment sliders are:
- Color temperature (Blue/Yellow)
- Tint (Magenta/Green)
- Exposure
- Whites
- Highlights
- Blacks
- Shadows
- Clarity
- Dehaze
- Vibrance
- Saturation
- HSL Sliders (Hue, Saturation, and Luminence sliders for each color.)
Why Should I Use Presets I Create myself?
There are two answers to this question:
#1: It speeds up your workflow!
Creating your own Lightroom presets for adjustments you make more or less to every single image that you have to process simply saves you time. It speeds up your workflow and gives you peace of mind that you sharpened every single image that you needed to.
If you find yourself continuously making the same exact edits (within a few increments on the sliders!) to every single photo, why not speed up the editing process? This way, you know all of your photos have the edits you use all the time and then you can focus on making the individual adjustments that each photo might need.
For instance, you might need to make a slightly different exposure adjustment for a group of images because you were shooting in natural light and the light changed during your shooting process.
Pro Tip: When this happens you can make sure that all of your images have the same exposure by selecting them all (Mac: Cmd+A / PC: Ctrl+A) and navigating to “Settings” -> “Match Total Exposures.”
Now that your images are all the same exposure, you can effectively use a preset on all of them. If you did this before you matched the exposures, the exposures would still be all over the place.
#2: It will help to define your own personal photographic style.
Creating your own specific presets helps you define your photographic style while editing. There are many factors that go into your own personal style including composition, propping, food styling, background and surface choices, choices made while shooting (camera settings), and finally how you process your food images in a photo manipulation software.
When you learn manipulation techniques using the adjustment sliders in Lightroom you will understand what each slider actually does and how your images are impacted. This step in the process helps to define your editing style and choices.
Can I Buy Lightroom presets instead?
You definitely can. I’m just not sure why you would want to do that! There are some instances where they are helpful. I personally have downloaded free packs and have not found them to be the magic wand I thought they’d be.
Another thing to note is that using free presets won’t help you understand the adjustments that were made to the photos which in turn would make it almost impossible to understand what each adjustment slider does and how they each impact your image.
For instance, if I simply apply a preset, call it “done” and export my image without looking at and analyzing the adjustments, I’m doing myself a disservice by not learning anything new.
If I continue with the scenario above, I won’t notice that the highlights on a preset I’ve just used are turned all the way down and that the whites are turned down slightly. This wouldn’t help me understand the difference between each of the sliders.
Pro Tip: The white slider sets the white point in the image while the highlight slider controls a smaller tonal range of the bright areas in the photo. It makes sense to set your white point and then adjust the highlights based on that white point.
Lightroom presets that are installed in your catalog don’t always help you define your own editing style. This is important to cultivate and an essential part of the photographic process.
If you’re reading this thinking something like: “My entire editing workflow is using presets! Am I doing it wrong?”
The answer is no, you’re not. It’s okay to use presets when they work well. It is especially okay when you’re just starting out to help you understand the editing process and how the adjustments change the visual look and feel of the photograph. You can use presets as a tool to help you learn how to edit your own photos.
How to install Lightroom presets?
When you download presets they will likely be in a zip file saved to your downloads folder. To open a zip file you double click on it and your computer will create a new folder with the same name as the zip file.
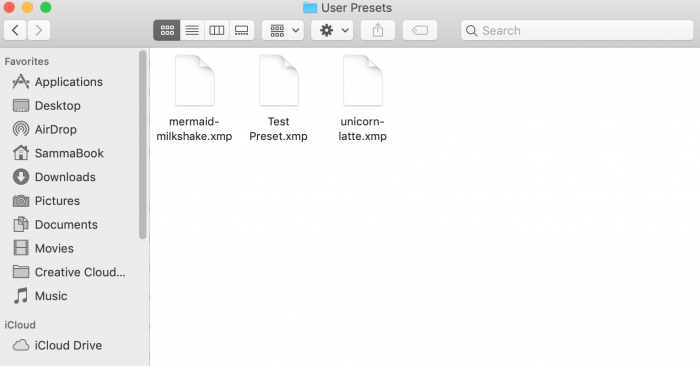
Inside this new folder, you will find a file likely named the preset name. They are usually cutesy names like “Unicorn Latte” or “Mermaid Milkshake.”
So the file name would look something like this: “unicorn-latte.lrtemplate” for older presets (made for Lightroom 4-6). If it is a preset made for Classic CC it will look like this: “unicorn-latte.xmp” and you will need to load them into Lightroom in a slightly more complex way.
For Lightroom 4-6 presets Ending in “.lrtemplate” as the file extension:
Double click on this file and it will automatically load into your Lightroom catalog. Lightroom will do the work of converting them to .xmp files and you should get a dialogue message that says the .xmp conversion was complete.

For Lightroom Classic CC presets ending in “.xmp” as the file extension:
The path you’ll need to follow begins in Lightroom. Open Lightroom and navigate to “Lightroom Classic” -> “Preferences” -> “Presets” -> “Show Lightroom Develop Settings” -> “Settings” folder -> “User Presets” folder.
Next, you’ll copy your files (remember our example above? Select and copy “unicorn-latte.xmp” and paste it into the “User Presets” folder on your computer.
You’ll be able to see the presets on the left-hand side in the develop module under the section labeled “presets” after you restart your Lightroom catalog.
The best ways to use presets that you’ve downloaded:
My suggestion is to use presets you’ve loaded into your Lightroom catalog sparingly.
Below is a short list of the best ways to use a pre-made Lightroom preset. Keep in mind I’m talking about the presets you didn’t create yourself in this section!
- When they make sense and look great with your shots. I find this is few and far between with most presets.
- As a baseline for your own more personal edits based on your creativity and style.
- As a learning tool. Presets help to figure out what each adjustment did to the photograph in a visual way. It’s almost like reverse engineering something. At this point, you’re taking the edit apart so that you can put it back together.
Do your best not to rely on presets to avoid actually learning how to use each adjustment slider.
Remember, they might look like a lifesaver to help you quickly get beautiful food images for your blog but they don’t always fit your photographs or work with your style.
How to make your own Lightroom Preset?
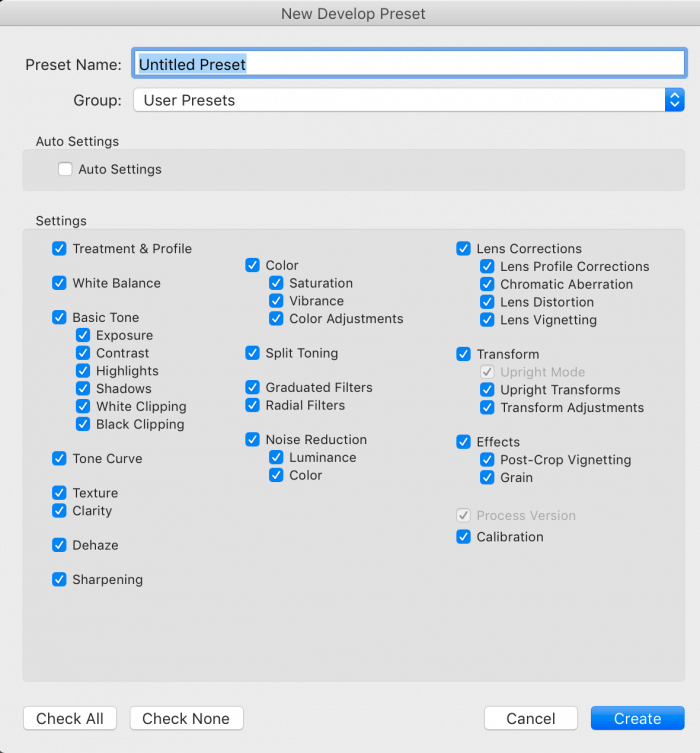
Make the adjustments you want to be stored within the preset. After the adjustments are made, make sure the image is selected in the timeline, navigate to “Develop” at the top of the Lightroom menu and select “New Preset.”
Next, you will be prompted to name your preset and put it into a preset group. The “User Presets” group is fine. You can always reorganize this later as you create more presets.
Below you will find a more detailed and printable how-to guide that lays out exactly how to create a preset after you’ve made your desired adjustments. I created this tutorial with Adobe Lightroom Classic CC 2019.
Keep in mind that if you are using an older version of Lightroom (or a newer version of Lightroom for that matter), these instructions may differ slightly.
How to use a Lightroom Preset?
Once you have a preset saved within your Lightroom catalog you can easily access the data.
To do this, navigate to the preset section within the develop module. You will find the preset section on the left side of your screen.
You may need to expand the preset options by clicking the nearby arrow.
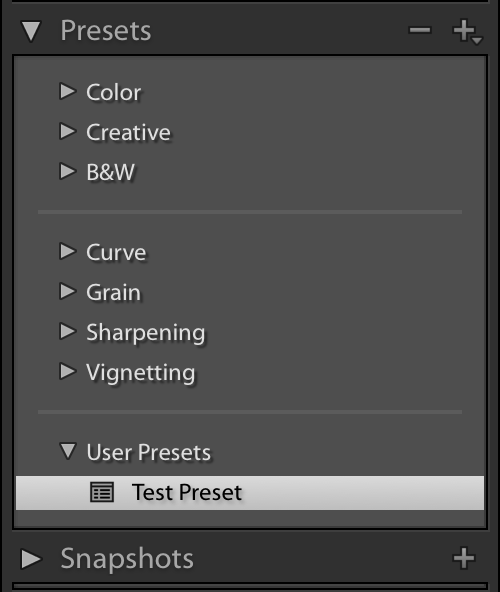
To apply the preset to a photograph, make sure you have selected the photograph in question. Once you are on the photograph you want to apply the preset to, navigate to the preset area on the left side of your photo. Finally, click on the preset you want to apply.
You should notice changes in your photo visually but you will also see the sliders have changed. They either show an increase in the adjustment or a decrease (using positive or negative numbers).
Can I Use Lightroom Presets to Speed Up Exporting my Photographs?

Yes, you can! Presets aren’t just for editing! You’ll see in the image above that there are options under “User Presets” under the “Export” option in Lightroom. You’ll see this view when you right-click a selected image from your filmstrip.
In order to create your own presets for exporting images, select your images and open the export dialogue box by choosing “Export” – > “Export” or using the shortcut to export images (Mac: Cmd+Shift+E / PC: Ctrl+Shift+E)

Once the Export dialogue box is open, make the adjustments you need to make for each of your options (Resizing, Resolution, File Extention, Metadata, Watermarking, etc) and then click “Add” on the lower right-hand side of the dialogue box.
Next, you should name your export preset and choose a group for it. Again, User Presets is fine unless you have a ton of these presets. Once you save your preset you’ll be able to access it quickly to export your images in the size that works best for your blog!
You could also create these presets for social media images to make sure they are the correct size or to make sure your images can be printed if necessary.
That’s it! We’ve covered a lot in this tutorial. To recap, you now know:
- What Lightroom presets are and how they can help speed up your workflow
- What adjustment sliders are
- How to install Lightroom presets on your computer
- The difference between types of presets (purchased, free downloads, or created yourself)
- How to use a Lightroom presets on your computer
- How to create your own Lightroom presets based on your own editing techniques.
Don’t forget you can print the guide within this post to help you create your first preset.
If you found this guide helpful in some way, share it with a friend!

How to Create Your Own Lightroom Presets
This how-to guide will assist you in creating your own presets to use in Lightroom to help speed up your photo editing workflow.
Materials
- Food Photographs
Tools
- Adobe Lightroom Classic CC
Instructions
- Import the photos into Lightroom Classic CC.
- Make the adjustments that you would like to have in the preset using the adjustment sliders on the right hand side of Lightroom.
- Some adjustments you can make: exposure, contrast, highlights, whites, shadows, and blacks.
- Continue to adjust texture, clarity, dehaze, vibrance, and saturation as you see fit.
- A tone curve adjustment is next, consider utilizing an "S" curve to adjust the contrast of your image. Here is where you can have many variations of edits, you might want to consider making a few presets utilizing the tone curve in different ways and then naming them using descriptive words.
- Move down to the detail panel and make your sharpening or noise reduction adjustments.
- Continue to make any adjustments that you usually make in Lightroom to all photographs you edit.
- Once done with your adjustments, navigate to "Develop" and choose "New Preset."
- A new dialogue box will open. Here you will choose what you want to be included in the preset and you will give the preset a name. Be descriptive so you know what is happening to the adjustments just by looking at the name.
- To use your new preset, navigate to the develop module. On the left-hand side, you will see a drop-down arrow named "Presets." Click on the arrow to expand the preset panel. Under user presets you will find any presets you have created or imported into Lightroom.
Notes
You may want to separate the adjustments I've mentioned above into separate presets. For instance, create a preset that deals with basic panel adjustments and then a separate preset for the tone curve of the image.
This process is incredibly helpful for when you make very similar adjustments to every single one of your food photographs. For instance, I generally always sharpen, add clarity, and adjust the vibrance of all of my images.
I also always remove chromatic abberations and enable profile corrections, while saving things like color adjustments using HSL (hue, saturation, and luminance) and overall exposure of the image for individual photographs as they tend to change from shot to shot.
Keep in mind that the adjustments I am making in this how-to guide are only basic image adjustments that I tend to do to every single one of my images. This is to speed up my workflow as I tend to sync these settings anyway and then make more individual adjustments as needed to each individual photograph.
This process might be slightly different for you based on your own editing workflow.
You may need to tweak these adjustments after you've applied your preset.
